If you want to tweak your Android system files on your device, then you might have noticed that you require root access. Because of the security reasons root user on Android is disabled by default, and you have to flash supersu or other root packages to gain root access on Android. Here we'll share steps on how to flash SuperSU with TWRP recovery to gain root permissions.
What is Root in Android?
Android is based on Linux, and on Linux and other UNIX operating systems, we have a root user account that is equivalent to the Administrator user account on Windows OS. The root user has access to the entire files, including the system files (operating system) and can modify, delete, or create new files, etc. A root user can do anything with the system files.
As Android is based on Linux, the root user account exists; however, there is no built-in way to access it. The process of gaining access to the root user account on Android is called Rooting.
Why you might want to Root Android?
Over the years, rooting has become less prominent and less necessary; however, there are still some apps and use cases where you might want to Root your Android phone.
Root access allows you to remove any bloatware that comes with your phone. It also allows you to run a firewall, enable tethering even if it is blocked by the carrier, manually backup the system, and use a variety of tweaks that require low-level system access.
Things to Remember Before Rooting Android
Android devices don't come with root access for security reasons, and some OEM manufacturers go out of their way to prevent users from rooting their devices. Below are some of the reasons why Android devices are not shipped with root permissions.
- Security: Rooting breaks Android's standard security sandbox. Apps could abuse root privileges to snoop on other apps. This is the reason why some payment and bank apps prevent you from using them on the rooted Android phone.
- Warranty: Rooting voids the device warranty. However, rooting will not damage your hardware. In most cases, you can unroot your device, and the manufacturer will not be able to tell if it has been rooted earlier.
- Bricking: If you're a newbie or don't have proper knowledge about the Android file system, you may brick your Android device. As usual, rooting must be done at your own risk. If you mess something up, you can't expect the free warranty service to fix it. We recommend you to do a bit of research first before rooting your device.
Preparing to Root Android using SuperSU flashable zip
- As usual first of all, back up all of your data to a safe place.
- Rooting requires an unlocked bootloader. So, unlock Bootloader on your Android phone before proceeding with the rooting process.
- Flash TWRP recovery on your Android. Stock recovery lacks many features, so it is recommended to flash TWRP Recovery for flashing SuperSU or Superuser root packages.
What is SuperSU?
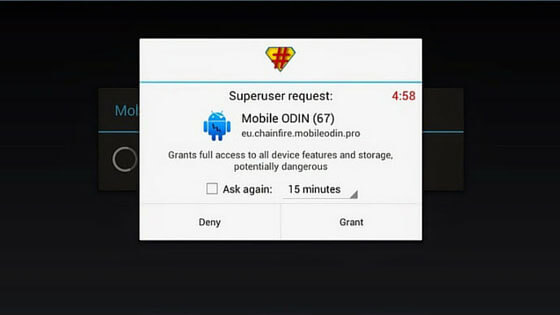
SuperSU is a root package that contains SuperSU binaries and the Superuser manager app. It is developed by Chainfire and is one of the most popular Root managers.
The SuperSU binaries help to gain root access, and the SuperSU app helps in managing root permissions for the Android Apps. SuperSU is available as a flashable zip package that can be flashed using any Custom Recovery like TWRP, CWM, or PhilZ, etc.
Download SuperSU Flashable Zip – Latest Version
SuperSU is available as a flashable zip file that can be flashed from TWRP, CWM, or PhilZ Recovery. As the years passed, several versions of Android were released, and with every new version Rooting process changed. Hence, several versions of SuperSU were released, and you can download most versions of SuperSU from the below link.
How to Flash SuperSU with TWRP Recovery
- Download the SuperSU recovery flashable zip package from the above downloads section.
- Once downloaded, transfer it to your phone's internal storage.
- Now, boot your phone into Recovery Mode (TWRP Recovery).
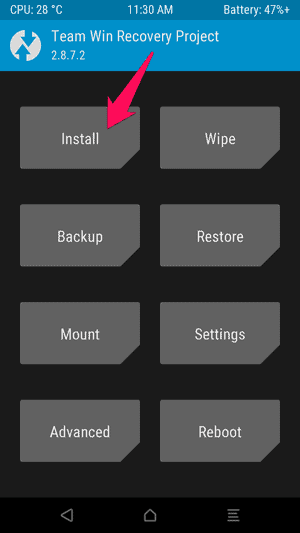
- Once the phone boots into TWRP Recovery, tap on Install.
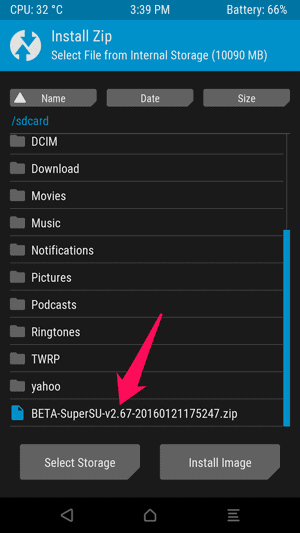
- Now, select the SuperSU zip file, which you have copied earlier in Step #2.
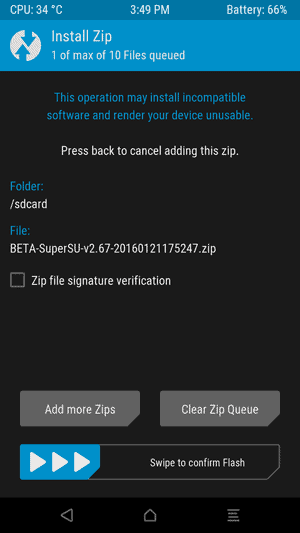
- Now, you will see the below screen, Swipe to confirm flash.
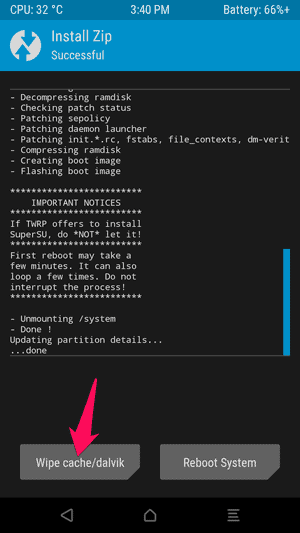
- It should only take a moment to flash the SuperSU package. When it finishes, tap on Wipe cache/dalvik button that appears and swipe to confirm.
- Now, select the Reboot System option to reboot your device.
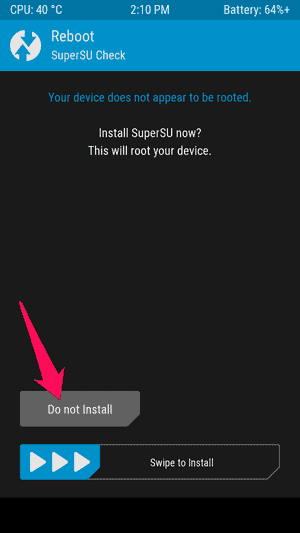
- If TWRP asks if you want to install SuperSU now, tap on "Do not Install". Sometimes, TWRP can't detect that you already have SuperSU, so it'll ask to flash its built-in version. But it is almost always best to flash the latest version of SuperSU, which we've just done.
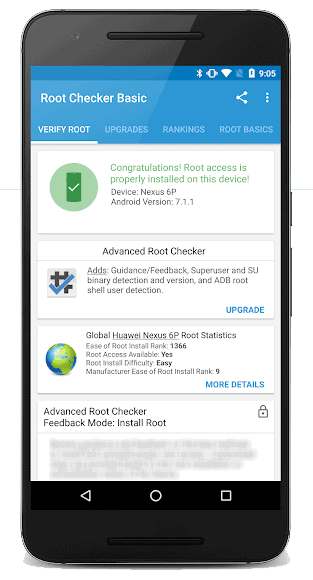
- After reboot, make sure to check for Root Permissions using the Root Checker app.
That's it! We are done flashing SuperSU with TWRP Recovery.
Bonus
Want to flash SuperSU using CWM or PhilZ Recovery? Follow the instructions listed in this tutorial.
Have any queries? Ask them below.
This page may contain affiliate links so we earn a commission. Please read our affiliate disclosure for more info.


JOIN THE DISCUSSION: