In this tutorial checkout how to Root Dell Venue 8 Android Tablet with easy and simple steps – Complete Guide
Dell Venue 8 was launched back in October 2013 and the device comes with 8.0 Inch display and so it’s called Dell Venue 8, because of the display size. It is powered by 2 GHz Dual-Core Intel Atom Z2580 processor combined with 2GB RAM and 16GB / 32GB internal storage. The device runs on Android 4.2.2 Jelly Bean out of the box and was recently updated to Android 5.1 Lollipop. Other specs include 5 MP primary camera, Wi-Fi, Bluetooth and GPS.
As I told Dell Venue 8 was updated to Android 5.1 Lollipop recently and this brings some goods features and bug fixes to the device and increases the quality of overall experience with the tablet. Those who updated their Dell Venue 8 Tablet to Android 5.1 Lollipop might have noticed that, they have lost the root access and in this tutorial we are going to show you how to Root Dell Venue 8 Android Tablet.
Early Preparations:
- It is recommended to have a complete backup of your device before you proceed.
- Enable USB Debugging on Dell Venue 8.
- Download and install the suitable Dell USB drivers on PC.
- Also make sure to install ADB and Fastboot drivers.
- Charge Dell Venue 8 to at least 75%.
Disclaimer: Rooting Dell Venue 8 voids its warranty and if done incorrectly may brick your device. So we recommend you to proceed with the below steps at your own risk and we are not responsible for any damage to your device.
Things we will need:
- Intel Phone Flash Tool Lite (Download and install it on your PC)
- venue_7840_droidboots.zip – Download
- Tethered Temporary Recovery - IntelAndroid-FBRL-05-16-2015-PTR.7z
- UPDATE-SuperSU-v2.46.zip
Also Read: How to Install TWRP Recovery and Root LG G4 – All Variants
How to Root Dell Venue 8 Android Tablet:
Part 1: Flashing the Old Firmware and Droidboot
- Download and install the Intel Phone Flash Tool Lite on your PC. Also download the venue_7840_droidboots.zip.
- Run Intel Phone Flash Tool as administrator and connect Dell Venue 8 to PC using OEM USB cable.
- Browse and choose venue_7840_droidboots.zip file.
- Select '1-502_droidboot_and_firmware.xml' from the drop down menu and click on start.
- Reboot Dell Venue 8.
Part 2: Booting into Temporary Recovery and Rooting Dell Venue 8
- Download the UPDATE-SuperSU-v2.46.zip from the above links.
- Extract IntelAndroid-FBRL-05-16-2015-PTR.7z
- Connect Dell Venue 8 to PC.
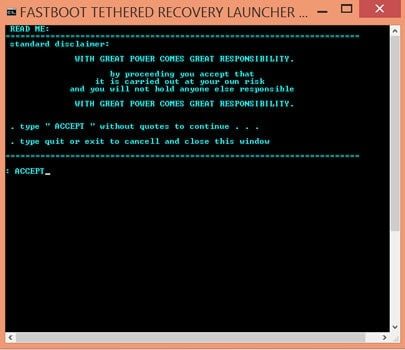
- Run launcher.bat file.
- Type ACCEPT in the command window.
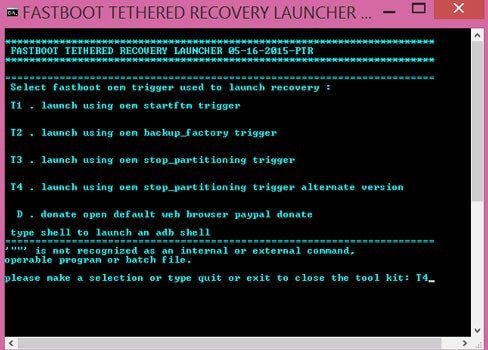
- Now type T4 to select trigger 4. This will boot your device into Temporary Recovery.
- Now on your device you should be inside the Temporary CWM Recovery.
- Choose Install zip and select UPDATe-SuperSU-v2.46.zip and install it.
- Once installed Reboot your device and confirm root access using Root Checker App.
Part 3: Flashing the New Firmware and Droidboot
- Run the Intel Phone Flash Tool and connect your device to PC.
- Browse and select venue_7840_droidboots.zip file.
- Now select '2-510_droidboot.xml' and click Start to flash it.
- Then select '3-510_firmware.xml' and click start to flash.
- Reboot your device and you should be on latest firmware with Root access.
That’s it, Congratulations! Now you have successfully learnt how to Root Dell Venue 8 Android Tablet. Do share this tutorial with your friends on Facebook, Twitter and Google Plus and let them know how to Root Dell Venue 8 Android Lollipop Tablet.
Have any questions? Ask them in the comment section below.
This page may contain affiliate links so we earn a commission. Please read our affiliate disclosure for more info.


There are many tools that can root your phone now and some of this doesn’t requires PC.