Enable USB Debugging in Android 5.0 Lollipop, Android 4.4 KitKat, Android 4.3 Jelly Bean Smartphones
Enabling the USB Debugging option on any Android Smartphone is an easy and quick process. It is also important to enable USB Debugging because without enabling it you cannot root or update your Android mobiles. After Enabling USB Debugging option, you can connect your Android phones to PC and use the Android SDK along with it. So here we brought easy tutorial for new Android users on How to Enable USB Debugging option in All Android Mobile Phones.
The USB Debugging options will be available on each and every Android device but differ in various Android versions. Google is making changes to the latest operating systems and along with that the path to enable the USB Debugging option changes. Google created this option for Android developers who really wants to test the apps on various devices.
How to Enable USB Debugging Mode on Any Android device?
Follow the below instructions to enable USB Debugging option on any Android Smartphone. We have given separate instructions for Android 2.3, 4.0 and 4.2 version. See your Android version and follow the below easy tutorial.
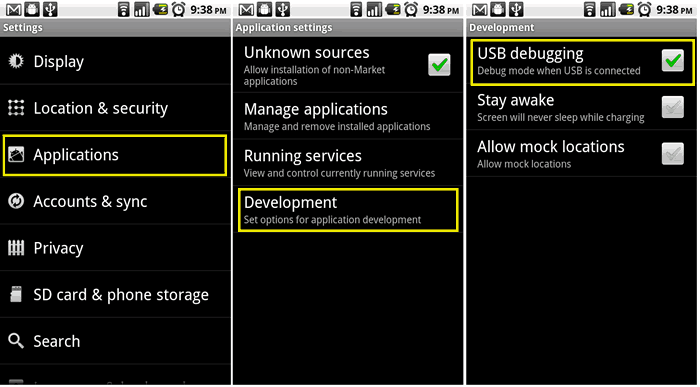
How to Enable USB Debugging In Android 2.3 or Earlier Versions:
- Go to “Settings” on your Android 2.3 Smartphone.
- Their select the “Applications” options.
- From there head to option “Development”.
- Now, tick the “USB Debugging” to enable it.
How to Enable USB Debugging In Android 4.0 or Higher Version:
- Google has slightly changed the USB Debugging option in Android 4.0 version smartphones when compared to the below versions.
- Go to “Settings” from the Main Menu.
- Scrolling down, you will find “Developer Option”. Tap on it.
- Next, you will see “USB Debugging” option. Just enable it by tapping on it.
How to Enable USB Debugging Mode In Android 4.2, 4.3, 4.4, 5.0, etc.
- Google in the Android version 4.2 or above has hidden the option of USB Debugging for the users who are not much familiar to use developing tools.
- From Main Menu, go to “Settings” option.
- From there go to “About” option.
- Now find “Build number” by scrolling down after tapping the About option.
- Now Tap that Build Number option repeatedly for 7 times. After completing the third tap, it will show a message saying you have only 4 more taps to be a developer.
- Continue tapping until you see a message “Hooray, you are now a Developer”. Now go back to “Settings” page.
- That’s it, now you can see the “Developer Options”.
- Launch the developer options, then check the “USB Debugging” option. Tap “OK”. Now you have the control over the device even as a non-developer.
Enjoy! Now easily root or update your Android smartphone by following the appropriate procedure.
This page may contain affiliate links so we earn a commission. Please read our affiliate disclosure for more info.


JOIN THE DISCUSSION: